Keycloak is an open source identity and access management solution. In this blog entry I will describe how to implement Single Sign On (SSO) to your nextcloud installation using Keycloak and SAML.
Important remarks
While setting up, please stay logged in and test with a second browser. In case you lose connection to your nextcloud account, you can try to connect login to http://nextcloud.my.domain/login?direct=1 to login with your admin account again.
For the setup you need to have SSO & SAML authentication app installed. If not yet installed, install it first.
You will need to provide a certificate and a private key. It is also possible to create the certificate manually (e.g. using openssl), export it from nextcloud and import into keycloak. I am using the method to generate the keys by keycloak and import them into nextcloud. Keycloak writes certificates / keys not in PEM format so you will need to change the export manually. The export into the keystore can be automatically converted into the right format to be used in Nextcloud.
Step 1: Setup Nextcloud
Login to your nextcloud instance and select Settings -> SSO and SAML authentication.
In the global settings select (for a first test) the following settings:
- Only allow authentication if an account exists on some other backend. (e.g. LDAP) –> Yes
- Use SAML auth for the Joerns Cloud desktop clients (requires user re-authentication) –> No
- Allow the use of multiple user back-ends (e.g. LDAP) –> Yes
Allow use of multible user back-ends will allow to select the login method. You can disable this setting once Keycloak is connected successfuly.
Add a new identity provider
Start to setup a new identity provider with the following settings
- Attribute to map the UID to –> username
- Displayname –> any name you like – e.g. Keycloak
- Name id format –> unspecififed
- X.509 certificate of the service provider –> leave empty for the moment
- Private key of the service provider –> leave also empty for now
- Identifier of the IdP entry –> https://keycloak.my.domain/auth/realms/<yourrealm>
- URL, Target of the IdP where the SP will send the Authentication Request Message –> https://keycloak.my.domain/auth/realms/<yourrealm>/protocol/saml
- URL Location of the IdP where the SP will send SLO Request –> https://keycloak.my.domain/auth/realms/<yourrealm>/protocol/saml
- Public X.509 certificate of the IdP –> leave empty
In the security settings check the following options:
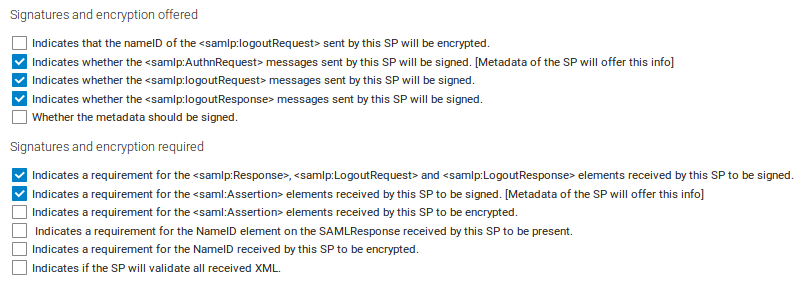
Download the metadata XML. Nextcloud will complain the security settings are not ok – but you can ignore this for now.
Step 2: Setup Keycloak
Login to your Keycloak Admin account, select the realm you want to connect to and create a new client. Use the import function to import the just created metadata XML. The client ID will be a URL – keep it as it is. You may want to give a name – e.g. Nextcloud.
As root URL set https://nextcloud.my.domain and as valid redirect URLs /*. (Adjust these settings to your needs / installation and folders). Then save the client settings.
Define keys
Select the SAML keys tab and create new keys. Aftwards export them as JKS (Java Key Store) file. Use as keyalias “nextcloud” and as realm certificate “myrealm”. You have to select a password for both exports to be able to download the keystore. Save it – we will need it to finalize the Nextcloud setup.
Define Mappers
Then go to the mappers tab and create the following mappers
- username
- name: username
- maper type: user property
- property: username
- SAML attribute name: username
- SAML attribute NameFormat: basic
- email
- name: email
- maper type: user property
- property: email
- SAML attribute name: email
- SAML attribute NameFormat: basic
- nextcloudquota
- name: nextcloudquota
- maper type: user property
- property: nextcloudquota
- SAML attribute name: nextcloudquota
- SAML attribute NameFormat: basic
- Roles
- name: Roles
- mapper type: Role List
- Role attribute name: Roles
- Friendly name: roles
- SAML Attribute NameFormat: Basic
- Single Role Attribute: On
Step 3: Finalize Nextcloud setup
As final step you need to provide the generated keys into the Nextcloud installation. The easiest ways to open a keystore is to use KeyStore Explorer. Edit your created identity provider again, and provide the following information from the exported keystore file to your identity provider settings:
- private key of the service provider –> private key of “nextcloud”
- X.509 certificate of the service provider –> public key of “nextcloud”
- Public X.509 certificate of the IdP –> public key of “myrealm”